
Organizations have been exploring the use of semantic web technologies within their knowledge management and application development for the last decade. Indeed the integration of web services into the landscape provides several benefits, such as improving application sharing, increasing flexibility, and including innovative knowledge representation mechanisms providing machine readability for AI and ML workloads. Conceptually, semantic Web works on a principle of least power: the less rules, the better. This means that the Semantic Web is essentially very unconstraining in what it lets one say, and hence it follows that anyone can say anything about anything - in our case today our quest would be to define Viewer semantically using custom HTML elements with the Web Component API.
Why Web Components?
One major incentive for us to use custom elements is that they are expressed as plain HTML elements in a well-defined and highly readable fashion for machine and human alike without requiring any external dependency or framework. And these custom elements can work alone unobtrusively in parallel with your existing frameworks (not a bad thing since Viewer can not be imported as a module into our project as of now) and can abstract away tedious details of the Viewer's APIs so developers can re-align focus where it's due - all that takes is a modern browser as illustrated below:

Our First Component
One of the key features of the Web Components standard is the ability to create custom elements that encapsulate your functionality on an HTML page, rather than having to make do with a long, nested batch of elements that together provide a custom page feature - to define a custom component simple do:
//...
<body>
  <word-count>Contents go here</word-count>
<script>
customElements.define('word-count', WordCount, { extends: 'p' });
</script>
//...
Getting Started with Viewer Component
So to get you started quickly with custom components for Viewer we created a reference package here. You can install it with NPM or Bower:
npm install forge-viewer-web-component
bower install forge-viewer-web-componentOr reference it directly on UNPKG:
<script src="https://unpkg.com/forge-viewer-web-component/dist/viewer-component.js"></script>
Now all we need to spin up a Viewer is the code below, note we no longer need script tags to load the Viewer library explicitly - our Viewer component will take care of their loading asynchronously to boost our time to first render:
<!DOCTYPE html>
<html>
//..
<body>
	<forge-viewer>
		<model url='https://dukedhx.github.io/Forge-Workshop/shaver/0.svf' />
	</forge-viewer>
//...
<script src="https://unpkg.com/forge-viewer-web-component@1.0.1-rc.0/dist/viewer-component.js"></script>
//...
</body>
</html>
You can slip in your access tokens and URNs and with more freedom w/o having to specify explicitly the load environment (`env:Local` etc.) - the component will take care of that, but note you can only load models either by their URNs or URLs in one Viewer:
<forge-viewer access-token='eyJhbGciOiJIUzI1NiIsImtpZCI...'>

    <model urn='urn:adsk.objects:os.object:path/to.model'/> // ok!
    <model urn='dXJuOmFkc2sub2JqZWN0czpvcy5vYmplY3Q6c2JzYjIzMzMvc2JhaGFoYS5kd2c'/>  // this works too!
    <model url='...' /> // throws error as we can't load by both URNs and URLs in one Viewer block
</forge-viewer>
Advanced Usage
And to load multiple models with load options and a specific version version simply do:
<forge-viewer version="7.6"> <!-- defaults to v7 latest stable -->
  <model-options>
    {
      "globalOffset":{"x":0,"y":0,"z":0} //applies to all models in the block
    }
  </model-options>
  <viewer-options>
    {"extensions":["extension1", "extension2"]}
  </viewer-options>
  <init-options>
  	{"accessToken":"..."}
  </init-options>
    <model url='...'>
    	<options>
    		{"modelNameOverride": "newName"}
    	</options>
    </model>
    <model urn='...'/>
 </forge-viewer>

 <forge-viewer>  <!-- alternatively define everything in one options block -->
 	<options>
   	 {
   	 	"extensions":["extension1", "extension2"],
		"accessToken": "..."
     }
 	</options>
 	<model urn='...'/>
    <model urn='...'/>
 </forge-viewer>
We can use take advantage of the shadow DOM and hide our Viewer elements away from the rest of the app so they are temper-proof - unfortunately Viewer's built-in toolbar does not support shadow DOM so we will need to turn it off with:
<forge-viewer GUI='false' ...>
//Using GUIless viewer will turn on shadow DOM by default
And you can your Viewer in style - specify width, height and position and even throw in your own CSS block which is especially useful when using the shadow DOM as only the styling defined within the shadow block can affect its contents:
<forge-viewer css=".myClass #id{display:inline-block;}" width="50%" height="50%" position="fixed" left="50%">
<css>
#MyAwesomeStyles{
//styles
}
</css>
//...
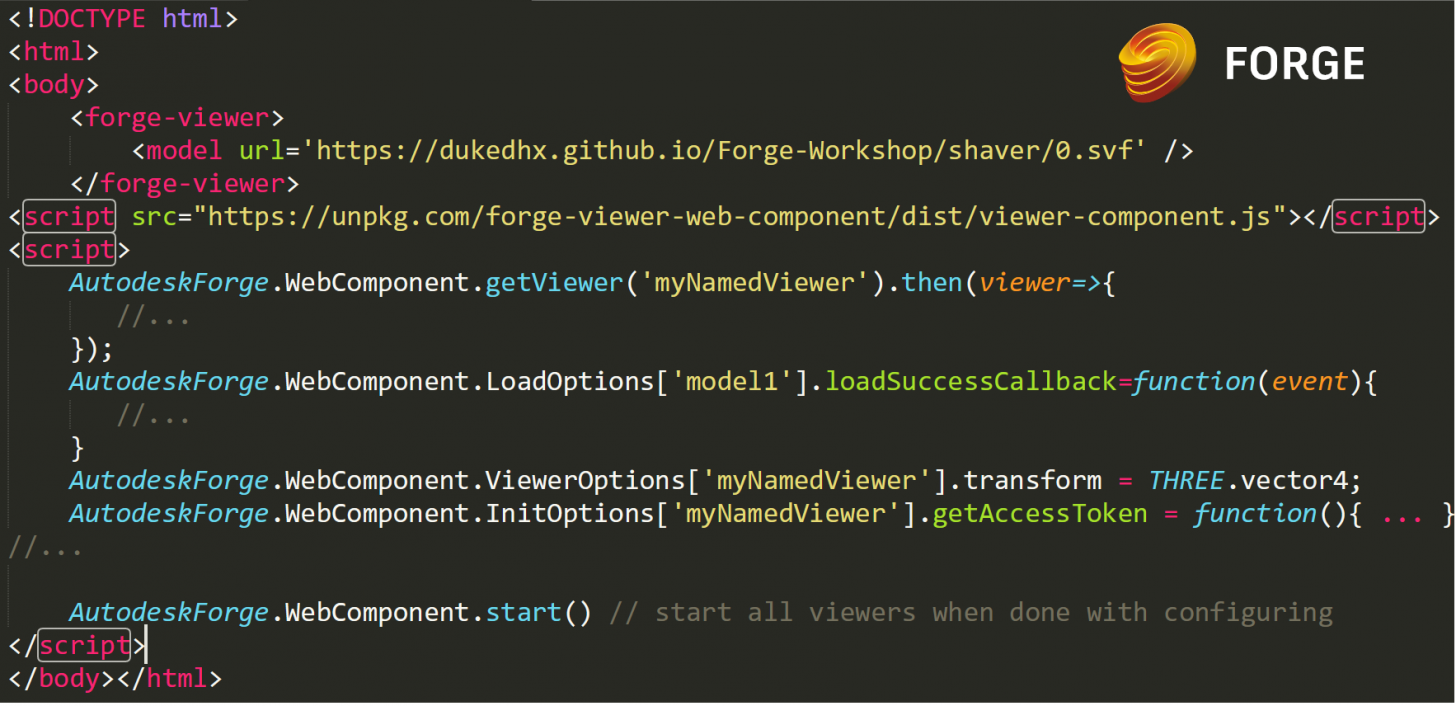
</forge-viewer>Everything is exposed via the "AutodeskForge.Webcomponent" global object as well - so you can hook your settings like callbacks, events easily - but be sure to defer the initialization with by flipping the "defer-load" attribute:
<forge-viewer delay-load='true' name='myNamedViewer' >
//...
    <model url='...' name='model1'/>
    <model url='...' name='model2' />

</forge-viewer>

<script>
    AutodeskForge.WebComponent.getViewer('myNamedViewer').then(viewer=>{
       //...
    });
    AutodeskForge.WebComponent.LoadOptions['model1'].loadSuccessCallback=function(event){
       //...
    }
    AutodeskForge.WebComponent.ViewerOptions['myNamedViewer'].transform = THREE.vector4;
    AutodeskForge.WebComponent.InitOptions['myNamedViewer'].getAccessToken = function(){ ... }
//...

    AutodeskForge.WebComponent.start() // start all viewers when done with configuring
</script>
We can also add "dependency" tags to load external scripts containing tools/extensions etc and defer their execution to soon as Viewer library completes loading - we need to do so instead of loading them as we did before as we are loading the Viewer library asynchronously to boost our time to render:
<forge-viewer>
//...

   <dependency src='/path/to/scrip12.js' />
   <dependency src='/path/to/script2.js' />
//...
 </forge-viewer>
We can now spin up multiple Viewers in style with complete ease - simply do:
<div style="display:grid; grid-template-columns: 50% 50%">
   <forge-viewer>
      //...
   </forge-viewer>
   <forge-viewer>
      //...
   </forge-viewer>
</div>
And reloading a Viewer and its model is as simple as:
AutodeskForge.WebComponent.terminate('myNamedViewer').then(()=>AutodeskForge.WebComponent.start('myNamedViewer'))
AutodeskForge.WebComponent.terminate().then(()=>AutodeskForge.WebComponent.start()) //Shut down and reload all Viewers
We can use take advantage of the shadow DOM and hide our Viewer elements away from the rest of the app so they are temper-proof - unfortunately Viewer's built-in toolbar does not support shadow DOM so we will need to turn it off with:
<forge-viewer GUI='false' ...>
//Using GUIless viewer will turn on shadow DOM by default
And see here for a great article to build your own custom toolbar.
Okay dokey - that's all we have time for today and next time we will be back to explore how the latest FaaS (Serverless) offerings on AWS and Azure can empower lean and highly functional Forge apps. Take care and until next time!
Disclaimer
THIS PROJECT IS PROVIDED “AS IS” AND MAINTAINED INDIVIDUALLY BY ITS CONTRIBUTORS, WITHOUT OFFICIAL SUPPORT BY ANY ORGANIZATION OR WARRANTY OF ANY KIND. IN NO EVENT SHALL THE CONTRIBUTORS OR COPYRIGHT HOLDERS BE LIABLE FOR ANY CLAIM, DAMAGES OR OTHER LIABILITY.
These web components have been tested to work with Viewer v5/6/7 on Chrome and Firefox. For technical assistance or bug reporting, kindly refrain from contacting Autodesk Technical Support or the Forge Partner Development team, log an issue here for the contributors to review.