
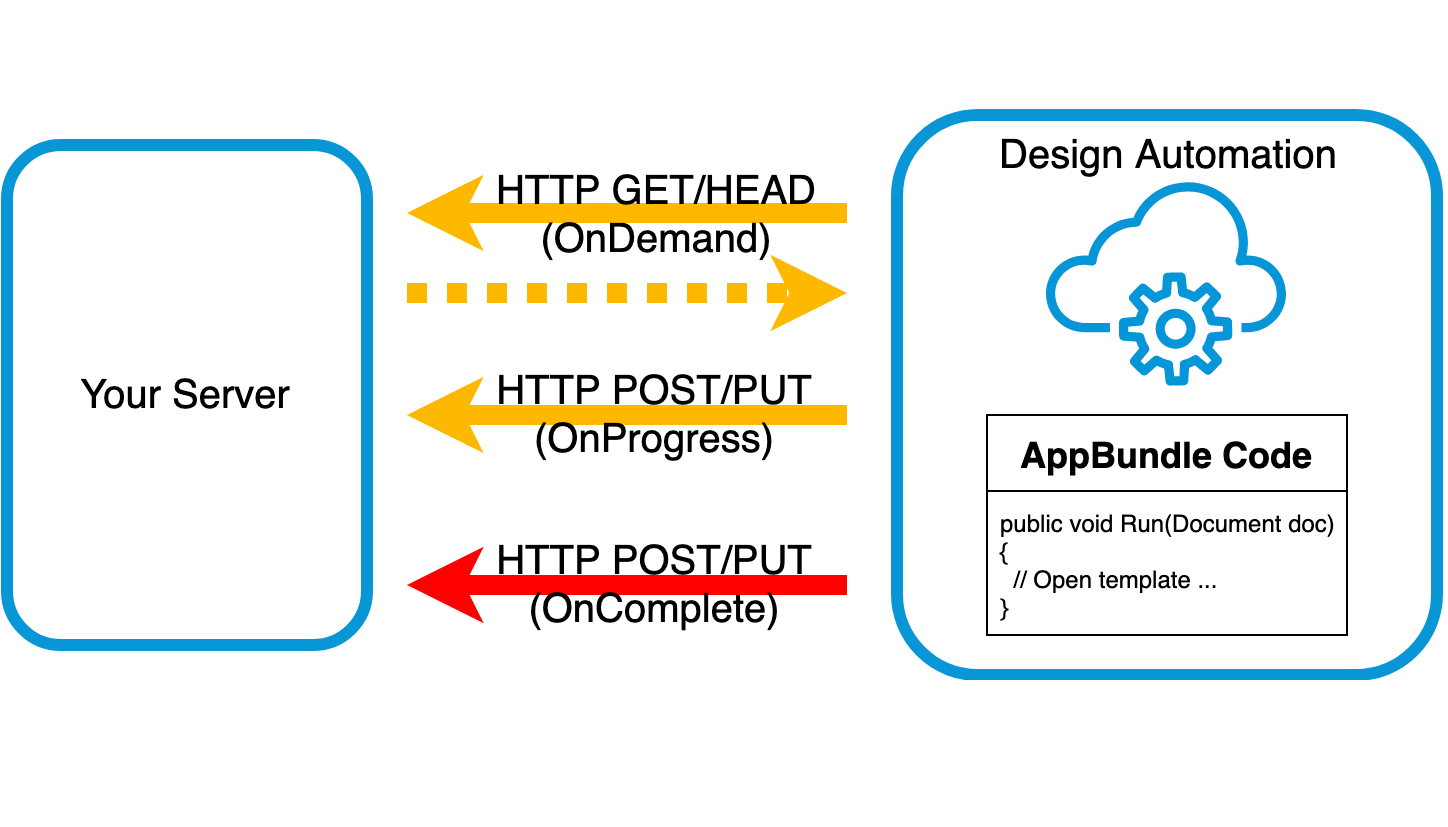
The way Design Automation was designed to be used is that you gather the input from a user or server, then pass what's needed to Design Automation to process the model - not an interactive process where information goes back and forth:

However, everything has pros and cons, and in certain scenarios it might make sense to push and pull information from a 3rd party (whether a user or a server) that will have an effect on how you are processing the model inside Design Automation - see picture on top.
So here are the various ways you can communicate with things outside the Design Automation server.
(note: there is information on the callback functions listed below on the developer site, but I thought it could be still useful to provide information about them in a different way)
Since they all rely on acesHttpOperation, this article might also come in handy: Cannot match arguments error when using acesHttpOperation
1) HTTP GET/HEAD - if you need to get data/file from a server then you can use the OnDemand callback
In this case, you can add query strings to the URL that is being used for the GET request and will be able to read the response coming back from the server. Though the response is saved into a file, it can be used not only for file downloads but for normal communication as well - you just have to read the content of the saved file ?
In order to use this, you have to declare a variable for your Activity with the "onDemand" property set to true, then set the URL to be used when creating the corresponding WorkItem.
WorkItem creation
{
  "activityId": "<client id>.<activity id>+<alias>",
  "arguments": {
    "MyGetRequest": {
      "onDemand": true,
      "verb": "get",
      "url": "https://webhook.site/myid"
  }
}
AppBundle code
const string responseFileName = "request.txt";
LogTrace("Sending a GET request");
// GetOnDemandFile parameters:
// <name of the onDemand input parameter as specified in the Activity>,
// <a query string - optional parameters that can be addded to the url defined in the WorkItem>,
// <http call headers>,
// <data or file for a post or put request>,
// <name of file to save the response to>
GetOnDemandFile(
  "MyGetRequest",
  "?id=get+test&value=something",
  "",
  "MyHeader-Item1=MyHeader Value1;MyHeader-Item2=MyHeader Value2",
  $"file://{responseFileName}");
string json = System.IO.File.ReadAllText(responseFileName);
LogTrace(json);
The implementation of GetOnDemandFile can be found here
The file will be saved in the Working Folder (i.e. current directory), the same place where the input files provided for the WorkItem will be placed too. In .NET you could use this to get the folder:
System.IO.Directory.GetCurrentDirectory()2) HTTP POST/PUT - if you need to post data to a server then you can use the OnProgress callback
In this case, you can send a POST/PUT request with data but you cannot see the response, only that it succeeded or not. Also, you cannot add URL query strings to the request - if you provide them, they will be ignored.
In order to use this, you just have to declare an "onProgress" property when creating the WorkItem and specify the URL to be used.
WorkItem creation
{
  "activityId": "<client id>.<activity id>+<alias>",
  "arguments": {
    "onProgress": {
      "verb": "post",
      "url": "https://webhook.site/myid"
  }
}
AppBundle code
LogTrace("Sending a POST request");
// GetOnDemandFile parameters:
// <name of the onDemand input parameter as specified in the Activity>,
// <a query string - optional parameters that can be addded to the url defined in the WorkItem>,
// <http call headers>,
// <data or file for a post or put request>,
// <name of file to save the response to>
GetOnDemandFile(
    "onProgress",
    "",
    "",
    "{'id': 'post test', 'value': 'something'}",
    "empty");
The additional data you provide will show up under the "progress" property of the json data sent to the URL you provided:
{"id":"774d88d03ab3478b82266b89a9075c9e","progress":"{'id': 'post test', 'value': 'something'}"}Note: Design Automation server will keep sending this request as well in the background, so your server should be aware of that.
3) HTTP POST/PUT - OnComplete callback
This function should only be called by Design Automation, and not through ACESAPI:acesHttpOperation()
In order to use this, you just have to declare an "onComplete" property when creating the WorkItem and specify the URL to be used.
4) Direct upload/download from app bundle
Now there is a 4th option currently in preview: Open Network in Preview
Testing
There are sites that can be used to test the above calls without running your own server.
If you just want to echo back the data that you are sending out then you can use https://docs.postman-echo.com/?version=latest
If you want to monitor the requests being sent then you can use https://webhook.site/
I'm sure there are many others out there too ?