
Quoting Wikipedia:
A progressive web application (PWA) is a type of application software delivered through the web, built using common web technologies including HTML, CSS and JavaScript. It is intended to work on any platform that uses a standards-compliant browser, including both desktop and mobile devices.
These applications typically make use of modern Web APIs such as Service Workers, Push Notifications, or IndexedDB. We already blogged about how the Service Worker APIs can be used to make your Forge application accessible in "temporarily disconnected workflows", and today we will explore some of the other APIs, and see how we can use them to turn our Forge application into a proper Progressive Web Application. We will take https://github.com/petrbroz/forge-basic-app as our starting point, and turn it into an application you can install on your iOS or Android device, run it in a "frameless" mode, and even get notified when the Model Derivative service is done translating our uploaded design!
Manifest
The first thing a PWA should have is the Web Application Manifest. This is where we describe how our application should look like and behave after it's been installed by a user, for example:
- image and label for the application icon
- background and theme colors (used for the loading screen, for example)
- starting URL and display mode
In our sample application we will add a new file called app.webmanifest to our public folder (where all our static assets are served from), with the following content:
{
    "name": "Forge Basic App",
    "short_name": "ForgeApp",
    "description": "Sample application showing the basic usage of Autodesk Forge.",
    "icons": [
        {
            "src": "/logo.png",
            "type": "image/png",
            "sizes": "48x48 72x72 96x96 128x128 256x256"
        }
    ],
    "start_url": "/",
    "display": "fullscreen",
    "theme_color": "#ffa835",
    "background_color": "#ffffff"
}
And in the public/index.html file, inside the <head> element, we will make sure that the manifest is loaded with the page:
...
<head>
  ...
  <link rel="manifest" href="app.webmanifest">
  ...
</head>
...
With this simple update we can already explore some of the initial benefits of the PWAs. When you serve the web application via HTTPS (because PWAs can only run in a secure context), and access the main page from your smartphone's browser, you should be prompted to install the application to your device. The installed application will use the icon and label we have configured, and when you open it, it will run in a "fullscreen" display mode, meaning that all the browser UI will be hidden and your application will occupy the entire screen. How cool is that?!
Push Notifications
The Push APIs can be used to send server notifications to your web application, even if it's not currently open.
Note that the notifications do not require your app to be a PWA. This API can be used with regular web applications running in a browser as well.
Handling the push notifications on the server side is a non-trivial task, but luckily there are various service providers that can help with that, for example, Amazon Simple Notification Service or Pusher Beams.
In our sample, however, we won't have to worry about any service provider because the NPM module we will be using - web-push - takes care of that for us. The module provides a command-line script we can use to generate the so-called VAPID keys, like so:
web-push generate-vapid-keys
Server side
To enable push notifications in our server application, we need to do a couple of things:
- Register our VAPID keys with the
web-pushmodule:
//...
const webpush = require('web-push');
const { VAPID_PUBLIC_KEY, VAPID_PRIVATE_KEY } = process.env;
webpush.setVapidDetails('mailto:your.email@domain.com', VAPID_PUBLIC_KEY, VAPID_PRIVATE_KEY);
//...
- Expose a new endpoint where the clients can subcribe for notifications (in our case, storing all subscriptions in a custom app property called "subs"):
//...
router.post('/push/subscribe', express.json(), async (req, res) => {
    const subscription = req.body;
    const subscriptions = req.app.get('subs') || [];
    subscriptions.push(subscription);
    req.app.set('subs', subscriptions);
    res.status(201).end();
});
//...
- Broadcast the notification when needed:
//...
const subscriptions = req.app.get('subs');
if (subscriptions) {
    const payload = JSON.stringify({ name: 'something', foo: 'bar' });
    for (const subscription of subscriptions) {
        webpush.sendNotification(subscription, payload)
            .catch(error => console.error(error.stack));
    }
}
//...
Client side
Next, we will update our client application so that it can subscribe to notifications (with the user's consent of course!), as well as get notified when any notifications are pushed to it by a server.
Subscription is handled through a push manager object that is available once we register a service worker for our web application. After calling the subscribe method of the push manager, using the VAPID public key we generated earlier (base64-encoded and converted into an Uint8Array), the browser will ask the user for their consent, and if successfull, we will receive a subscription object which can finally be sent to our new /push/subscribe endpoint:
Note that in our sample application we pass the VAPID public key to the client through a cookie.
//...
if ('serviceWorker' in navigator) {
    const registration = await navigator.serviceWorker.register('/service-worker.js', { scope: '/' });
    setupNotifications(registration.pushManager);
}
//...
async function setupNotifications(pushManager) {
    function urlBase64ToUint8Array(base64String) {
        const padding = '='.repeat((4 - base64String.length % 4) % 4);
        const base64 = (base64String + padding).replace(/-/g, '+').replace(/_/g, '/');
        const rawData = atob(base64);
        const outputArray = new Uint8Array(rawData.length);
        for (let i = 0; i < rawData.length; ++i) {
            outputArray[i] = rawData.charCodeAt(i);
        }
        return outputArray;
    }
    const match = document.cookie.match(/VAPID_PUBLIC_KEY=([\w\d_\+\-\/]+)/);
    if (match) {
        const vapidPublicKey = match[1];
        try {
            const subscription = await pushManager.subscribe({
                userVisibleOnly: true,
                applicationServerKey: urlBase64ToUint8Array(vapidPublicKey)
            });
            await fetch('/push/subscribe', {
                method: 'POST',
                body: JSON.stringify(subscription),
                headers: { 'Content-Type': 'application/json' }
            });
        } catch (err) {
            console.error(err);
        }
    }
}
//...
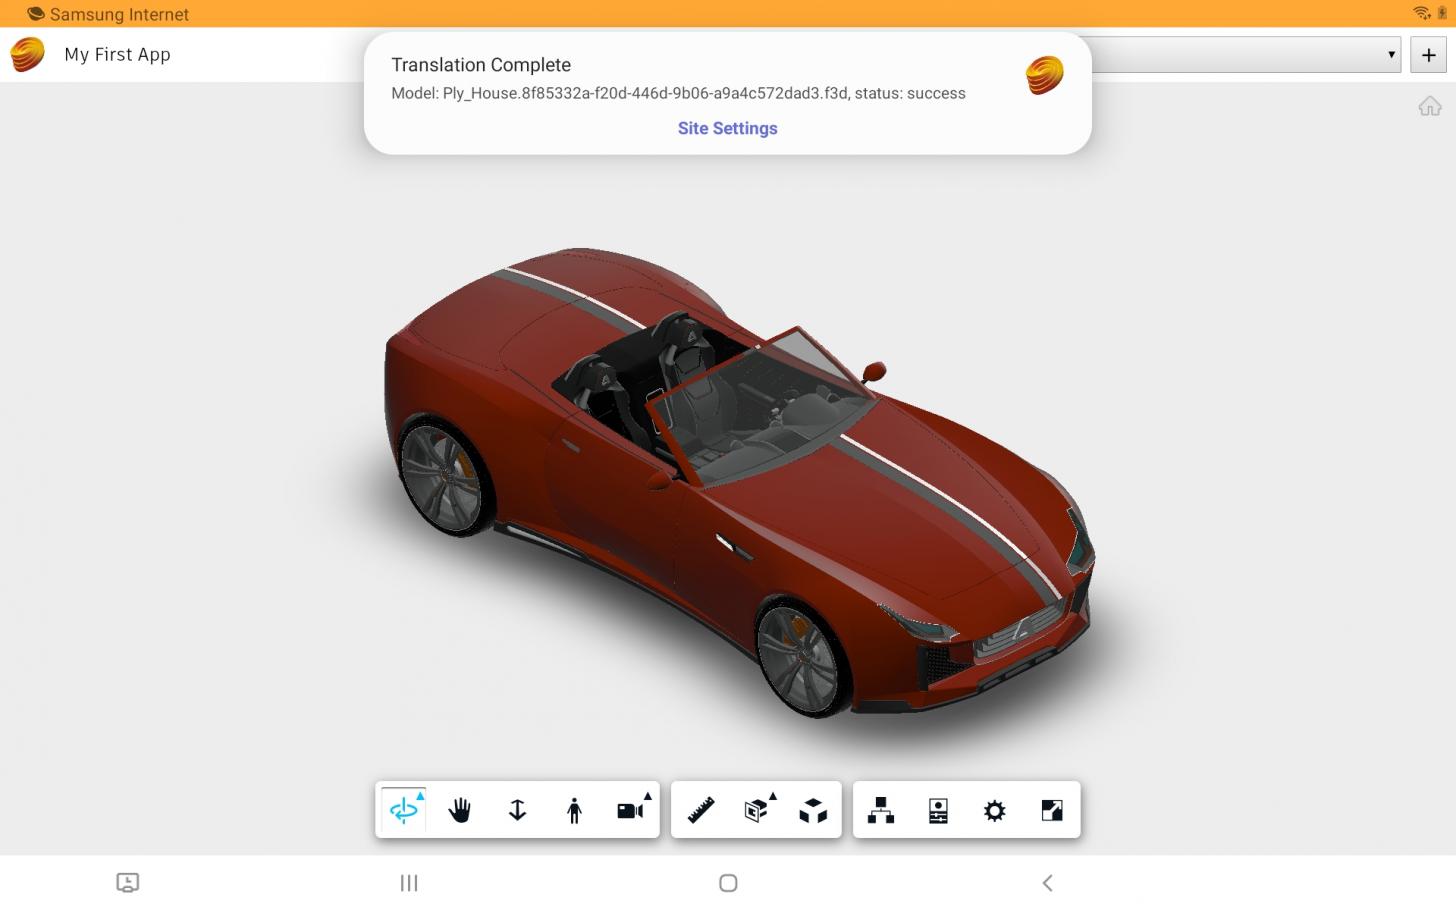
And finally, we provide a super-simple implementation of our service worker which will simply react to any notification pushed from the server by displaying it as an actual system notification:
self.addEventListener('push', ev => {
    const data = ev.data.json();
    self.registration.showNotification('Translation Complete', {
        body: `Model: ${data.name}, status: ${data.status}`,
        icon: '/logo.png'
    });
});
And that's it! Your PWA is now ready to accept notifications from our server.
If you'd like to check out how the https://github.com/petrbroz/forge-basic-app sample was turned into a PWA, take a look at the experiment/pwa branch. And if you'd like to deploy and run that sample yourself, see the README file for more info on how to generate the VAPID keys and pass them to the application.