12 Jul 2016
Projecting Dynamic Textures onto Flat Surfaces with Three.js

By Michael Ge (@hahakumquat)
First and foremost, the 3D Viewer is designed to display static 3D objects, but this is not to say that applications of the Viewer cannot have dynamic elements within it!
So far, most of the extensions on our blog have dealt with manipulating elements in the viewer to return static changes, but with relatively simple injections of Three.js code, it's possible to quickly turn a single-state model into a data-driven, dynamic 3D simulation.
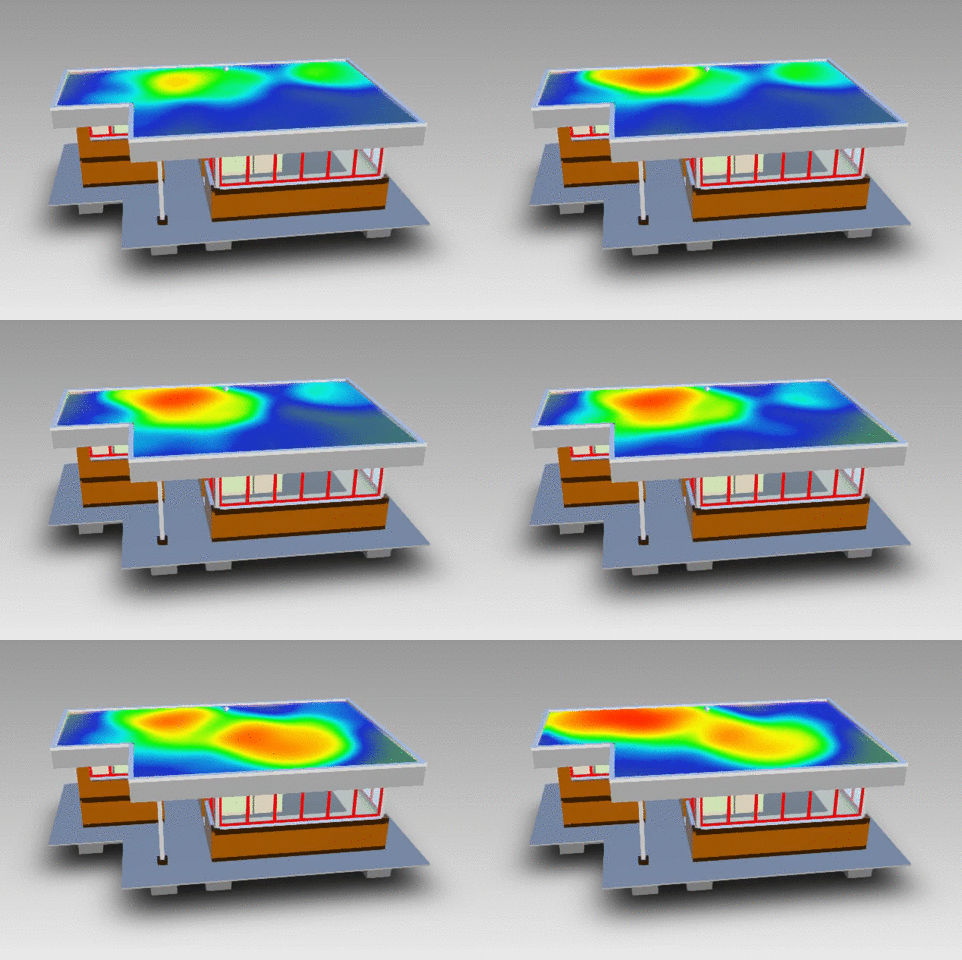
The extension I've developed is a heatmap projection onto a 3D model of a building. While the input "data" is currently random, the modular code makes it easy to substitute these randomly generated data points with real sensors in an actual building.
To visualize this data, I used mourner's simpleheat.js library to create a heatmap on a canvas element. From there, I created a Three.js plane and projected the texture onto the plane, masking out the shape of my desired rooftop. Several code snippets are taken from Philippe's examples, including getting the bounding box of a fragment and adjusting fragment positions. Overall, it's a simple process with plenty of documentation and resources, and with a few minor changes here and there, you should be able to achieve the same effect in any scene.
With that said, let's take a look at the actual code. The extension can be broken up into four main sections: Viewer functions, heatmap initialization, material initialization, and application of the material onto a mesh.
Viewer Functions
////////////////////////////////////////////////////////////////////////////

    /* Private Variables and constructor */

    // Heat Map Floor constructor
    Autodesk.Viewing.Extension.call(this, viewer, options);
    var _self = this;
    var _viewer = viewer;

    // Find fragmentId of a desired mesh by selection_changed_event listener
    var roofFrag = 1;

    // Settings configuration flags
    var progressiveRenderingWasOn = false, ambientShadowsWasOn = false;

    // simpleheat private variables
    var _heat, _data = [];
    // Configurable heatmap variables:
    // MAX-the maximum amplitude of data input
    // VAL-the value of a data input, in this case, it's constant
    // RESOLUTION-the size of the circles, high res -> smaller circles
    // FALLOFF-the rate a datapoint disappears
    var MAX = 2000, VAL = 1500, RESOLUTION = 10, FALLOFF = 30;

    // THREE.js private variables
    var _material, _texture, _bounds, _plane, Z_POS = -0.1; //3.44 for floor;

    ////////////////////////////////////////////////////////////////////////////

    /* Load, main, and unload functions */

    _self.load = function() {

        // Turn off progressive rendering and ambient shadows for nice look
        if (_viewer.prefs.progressiveRendering) {
            progressiveRenderingWasOn = true;
            _viewer.setProgressiveRendering(false);
        }
        if (_viewer.prefs.ambientShadows) {
            ambientShadowsWasOn = true;
            _viewer.prefs.set("ambientShadows", false);
        }

        _bounds = genBounds(roofFrag);
        _heat = genHeatMap();
        _texture = genTexture();
        _material = genMaterial();

        _plane = clonePlane();
        setMaterial(roofFrag, _material);

        animate();
        console.log("Heat Map Floor loaded.");
        return true;
    }

    _self.unload = function() {

        if (progressiveRenderingWasOn)
            _viewer.setProgressiveRendering(true);
        if (ambientShadowsWasOn) {
            _viewer.prefs.set("ambientShadows", true);
        }
        progressiveRenderingWasOn = ambientShadowsWasOn = false;

        delete _viewer.impl.matman().materials.heatmap;
        _viewer.impl.scene.remove(_plane);

        console.log("Heat Map Floor unloaded.");
        return true;
    }

    // Animation loop for checking for new points and drawing them on texture
    function animate() {
        requestAnimationFrame(animate);
        _heat.add(receivedData());
        _heat._data = decay(_heat._data);
        _heat.draw();

        _texture.needsUpdate = true;
        // setting var 3 to true enables invalidation even without changing scene
        _viewer.impl.invalidate(true, false, true);
    }

    ////////////////////////////////////////////////////////////////////////////

    /* Geometry/Fragment/Location functions */

    // Gets bounds of a fragment
    function genBounds(fragId) {
        var bBox = new THREE.Box3();
        _viewer.model.getFragmentList()
            .getWorldBounds(fragId, bBox);

        var width = Math.abs(bBox.max.x - bBox.min.x);
        var height = Math.abs(bBox.max.y - bBox.min.y);
        var depth = Math.abs(bBox.max.z - bBox.min.z);

        return {width: width, height: height, depth: depth, min: bBox.min};
    }
The scene will constantly be updating with new heatmap data, so we'll need to keep track of several private variables for the heatmap and plane. In addition, the constant updates yield rather ugly flickering with progressive rendering and grainy ambient shadows, so we'll also keep track of the settings' states before the extension is enabled so that we can revert to the original state.
The load function, when run on initialization, disables these settings, creates the material with the canvas, and projects the material onto the rooftop. As expected, unload undoes such modifications.
animate begins a requestAnimationFrame() loop that adds any received data from sensors (or in my implementation, random data), creates a data falloff effect over time, and tells the viewer to update itself with an updated texture. It's important here to note that the invalidate() call has a third parameter which, when set to true, updates overlays. This is critical to getting the texture overlay to update correctly.
Heatmap Initialization
///////////////////////////////////////////////////////////////////////

    /* Heatmap functions */

    // Starts a heatmap
    function genHeatMap() {

        var canvas = document.getElementById("texture");
        canvas.width = _bounds.width * RESOLUTION;
        canvas.height = _bounds.height * RESOLUTION;

        return simpleheat("texture").max(MAX);
    }

    // TODO: Replace with actually received data
    // returns an array of data received by sensors
    function receivedData() {

        return [Math.random() * $("#texture").width(),
                Math.random() * $("#texture").height(),
                Math.random() * VAL];
    }

    // decrements the amplitude of a signal by FALLOFF for decay over time
    function decay(data) {

        // removes elements whose amlitude is < 1
        return data.filter(function(d) {
            d[2] -= FALLOFF;
            return d[2] > 1;
        });
    }
mourner's simpleheat.js makes it easy to create a heatmap, taking in data with a Cartesian coordinate and amplitude, and outputting a circle with the designated location and color intensity.
genHeatMap simply creates a canvas to store the heatmap data, returning the generated simpleheat object.
Every time an animate function is called, the heatmap will add data from receivedData. Sensory input data in the format of a size-3 array could replace the currently random generation of data points.
For this experiment, I wanted to remove old datapoints. As a result, I created a decay function that lowers the amplitude values of all elements in the dataset over time, removing them once they become negligible, however it's possible to aggregate data over time, porting that information over from a database.
Material Initialization
Now that we have a dynamically updating canvas, we can apply it as a texture to a created Three.js plane:
    ///////////////////////////////////////////////////////////////////////

    /* Texture and material functions */

    // Creates a texture
    function genTexture() {

        var canvas = document.getElementById("texture");
        var texture = new THREE.Texture(canvas);
        return texture;
    }

    // generates a material
     function genMaterial() {

     var material = new THREE.MeshBasicMaterial({
         map: _texture,
         side: THREE.DoubleSide,
         alphaMap: THREE.ImageUtils.loadTexture("mask_crop.png")
     });
     material.transparent = true;

     // register the material under the name "heatmap"
     _viewer.impl.matman().addMaterial("heatmap", material, true);

     return material;
 }
genTexture creates a Three.Texture from the canvas that is mapped to the basic material. In order to exclude parts of the canvas that are outside the roof area, we also use an alpha mask like the following:
Applying the Material to a Mesh
We have the material ready to go, so now it's just a matter of applying it to the proper face.
 ///////////////////////////////////////////////////////////////////////

 /* Rendering the heatmap in the Viewer */

 function clonePlane() {

     // To use native three.js plane, use the following mesh constructor
     geom = new THREE.PlaneGeometry(_bounds.width, _bounds.height);
     plane = new THREE.Mesh(geom, _material);
     plane.position.set(0, 0, _bounds.min.z - Z_POS);

     _viewer.impl.addOverlay("pivot", plane);

     return plane;
 }
We create a geometry of the roof's width and size and apply the material. Finally, we move the original plane to the desired location and insert it into the scene as an overlay.
I also noticed that simply calling the addOverlay function without modifying the simpleheat.js code led to circular artifacts around the data points. This is an easy fix, however. Simply go into the draw function in simpleheat.js, and after the clearRect() function is called, draw a nearly completely transparent rectangle over the entire canvas:
        ...
        ctx.clearRect(0, 0, this._width, this._height);

        // include the following section
        ctx.fillStyle = "#FFFFFF";
        ctx.globalAlpha = 0.01;
        ctx.fillRect(0, 0, this._width, this._height);
        ctx.globalAlpha = 1;
Here's the full source code for the extension:
| AutodeskNamespace("Autodesk.ADN.Viewing.Extension"); | |
| AutodeskNamespace("Autodesk.ADN.Viewing.Extension.HeatMapFloorFlat"); | |
| Autodesk.ADN.Viewing.Extension.HeatMapFloorFlat = function(viewer, options) { | |
| //////////////////////////////////////////////////////////////////////////// | |
| /* Private Variables and constructor */ | |
| // Heat Map Floor constructor | |
| Autodesk.Viewing.Extension.call(this, viewer, options); | |
| var _self = this; | |
| var _viewer = viewer; | |
| // Settings configuration flags | |
| var progressiveRenderingWasOn = false, ambientShadowsWasOn = false; | |
| // Find fragmentId of a desired mesh by selection_changed_event listener | |
| var roofFrag = 1; | |
| // simpleheat private variables | |
| var _heat, _data = []; | |
| // Configurable heatmap variables: | |
| // MAX-the maximum amplitude of data input | |
| // VAL-the value of a data input, in this case, it's constant | |
| // RESOLUTION-the size of the circles, high res -> smaller circles | |
| // FALLOFF-the rate a datapoint disappears | |
| // Z_POS-vertical displacement of plane | |
| var MAX = 2000, VAL = 1500, RESOLUTION = 20, FALLOFF = 30, Z_POS = 0.1; | |
| // THREE.js private variables | |
| var _material, _texture, _bounds, _plane; | |
| //////////////////////////////////////////////////////////////////////////// | |
| /* Load, main, and unload functions */ | |
| _self.load = function() { | |
| // Turn off progressive rendering and ambient shadows for nice look | |
| if (_viewer.prefs.progressiveRendering) { | |
| progressiveRenderingWasOn = true; | |
| _viewer.setProgressiveRendering(false); | |
| } | |
| if (_viewer.prefs.ambientShadows) { | |
| ambientShadowsWasOn = true; | |
| _viewer.prefs.set("ambientShadows", false); | |
| } | |
| _bounds = genBounds(roofFrag); | |
| _heat = genHeatMap(); | |
| _texture = genTexture(); | |
| _material = genMaterial(); | |
| _plane = clonePlane(); | |
| animate(); | |
| console.log("Heat Map Floor loaded."); | |
| return true; | |
| } | |
| _self.unload = function() { | |
| if (progressiveRenderingWasOn) | |
| _viewer.setProgressiveRendering(true); | |
| if (ambientShadowsWasOn) { | |
| _viewer.prefs.set("ambientShadows", true); | |
| } | |
| if (groundShadowWasOn) { | |
| _viewer.setGroundShadow(true); | |
| } | |
| progressiveRenderingWasOn = ambientShadowsWasOn = groundShadowWasOn = false; | |
| delete _viewer.impl.matman().materials.heatmap; | |
| _viewer.impl.scene.remove(_plane); | |
| console.log("Heat Map Floor unloaded."); | |
| return true; | |
| } | |
| // Animation loop for checking for new points and drawing them on texture | |
| function animate() { | |
| requestAnimationFrame(animate); | |
| _heat.add(receivedData()); | |
| _heat.add(receivedData()); | |
| _heat.add(receivedData()); | |
| _heat._data = decay(_heat._data); | |
| _heat.draw(); | |
| _texture.needsUpdate = true; | |
| // setting var 3 to true enables invalidation even without changing scene | |
| _viewer.impl.invalidate(true, false, true); | |
| } | |
| //////////////////////////////////////////////////////////////////////////// | |
| /* Geometry/Fragment/Location functions */ | |
| // Gets bounds of a fragment | |
| function genBounds(fragId) { | |
| var bBox = new THREE.Box3(); | |
| _viewer.model.getFragmentList() | |
| .getWorldBounds(fragId, bBox); | |
| var width = Math.abs(bBox.max.x - bBox.min.x); | |
| var height = Math.abs(bBox.max.y - bBox.min.y); | |
| var depth = Math.abs(bBox.max.z - bBox.min.z); | |
| // min is used to shift for the shader, the others are roof dimensions | |
| return {width: width, height: height, depth: depth, min: bBox.min}; | |
| } | |
| /////////////////////////////////////////////////////////////////////// | |
| /* Heatmap functions */ | |
| // Starts a heatmap | |
| function genHeatMap() { | |
| var canvas = document.createElement("canvas"); | |
| canvas.id = "texture"; | |
| canvas.width = _bounds.width * RESOLUTION; | |
| canvas.height = _bounds.height * RESOLUTION; | |
| document.body.appendChild(canvas); | |
| return simpleheat("texture").max(MAX); | |
| } | |
| // TODO: Replace with actually received data | |
| // returns an array of data received by sensors | |
| function receivedData() { | |
| return [Math.random() * $("#texture").width(), | |
| Math.random() * $("#texture").height(), | |
| Math.random() * VAL]; | |
| } | |
| // decrements the amplitude of a signal by FALLOFF for decay over time | |
| function decay(data) { | |
| // removes elements whose amlitude is < 1 | |
| return data.filter(function(d) { | |
| d[2] -= FALLOFF; | |
| return d[2] > 1; | |
| }); | |
| } | |
| /////////////////////////////////////////////////////////////////////// | |
| /* Texture and material functions */ | |
| // Creates a texture | |
| function genTexture() { | |
| var canvas = document.getElementById("texture"); | |
| var texture = new THREE.Texture(canvas); | |
| return texture; | |
| } | |
| // generates a material | |
| function genMaterial() { | |
| var material = new THREE.MeshBasicMaterial({ | |
| map: _texture, | |
| side: THREE.DoubleSide, | |
| alphaMap: THREE.ImageUtils.loadTexture("mask.png") | |
| }); | |
| material.transparent = true; | |
| // register the material under the name "heatmap" | |
| _viewer.impl.matman().addMaterial("heatmap", material, true); | |
| return material; | |
| } | |
| /////////////////////////////////////////////////////////////////////// | |
| /* Rendering the heatmap in the Viewer */ | |
| // copies a fragment and moves it elsewhere | |
| function clonePlane() { | |
| // To use native three.js plane, use the following mesh constructor | |
| geom = new THREE.PlaneGeometry(_bounds.width, _bounds.height); | |
| plane = new THREE.Mesh(geom, _material); | |
| plane.position.set(0, 0, _bounds.min.z + Z_POS); | |
| _viewer.impl.addOverlay("pivot", plane); | |
| return plane; | |
| } | |
| } | |
| // Extension registration | |
| Autodesk.ADN.Viewing.Extension.HeatMapFloorFlat.prototype = | |
| Object.create(Autodesk.Viewing.Extension.prototype); | |
| Autodesk.ADN.Viewing.Extension.HeatMapFloorFlat.prototype.constructor = | |
| Autodesk.ADN.Viewing.Extension.HeatMapFloorFlat; | |
| Autodesk.Viewing.theExtensionManager.registerExtension( | |
| "HeatMapFloorFlat", | |
| Autodesk.ADN.Viewing.Extension.HeatMapFloorFlat); | |
And here is a link to the project demo.
Hope you like it!


