
Embedding custom three.js geometry into Forge Viewer is a very common request. We usually recommend using scene overlays, and those feeling more adventurous go directly to the uncharted territories of viewer.impl.scene or viewer.impl.sceneAfter. While these techniques work - meaning that you can see your custom objects rendered with your custom materials - they don't really play well with the rest of the viewer. You cannot hover or select the objects, move camera to them using the Viewer APIs, and so on. Well, if this is something you've been waiting for, worry no more! The Forge Viewer team has put together a new extension that turns your custom three.js content into "proper" viewer models: Autodesk.Viewing.SceneBuilder. Let's take a look at it!
What it can and can't do
The Autodesk.Viewing.SceneBuilder extension allows you to create Models similar to those you load from the Model Derivative service, and populate them on-the-fly. The extension is not meant to replace the scene overlays mentioned above. While overlays may be a better fit for certain scenarios, the content inserted with Autodesk.Viewing.SceneBuilder behaves just like the standard Forge models - you can interact with it both programatically and through user input.
However, the extension currently cannot:
- generate 2D models
- generate property database
- generate instance tree
Creating a new model
After loading the extension the usual way, call its (async) method addNewModel to create a new Model and instantiate a ModelBuilder for it:
async function addModel(viewer) {
  const sceneBuilder = await viewer.loadExtension('Autodesk.Viewing.SceneBuilder');
  const modelBuilder = await sceneBuilder.addNewModel({
    modelNameOverride: 'My Custom Model',
    conserveMemory: false
  });
  // ...
}
Note: the
conserveMemoryflag (falseby default) changes how the viewer stores the geometry.
When set totrue, all geometry in this model will be packed in a single mesh.
With the ModelBuilder ready, you can start populating the model with your custom three.js content.
Adding objects
There are a couple of ways to do add geometry to your custom model:
- by passing a
THREE.BufferGeometry, aTHREE.Material, and aTHREE.Transformto the ModelBuilder#addFragment method, for example:
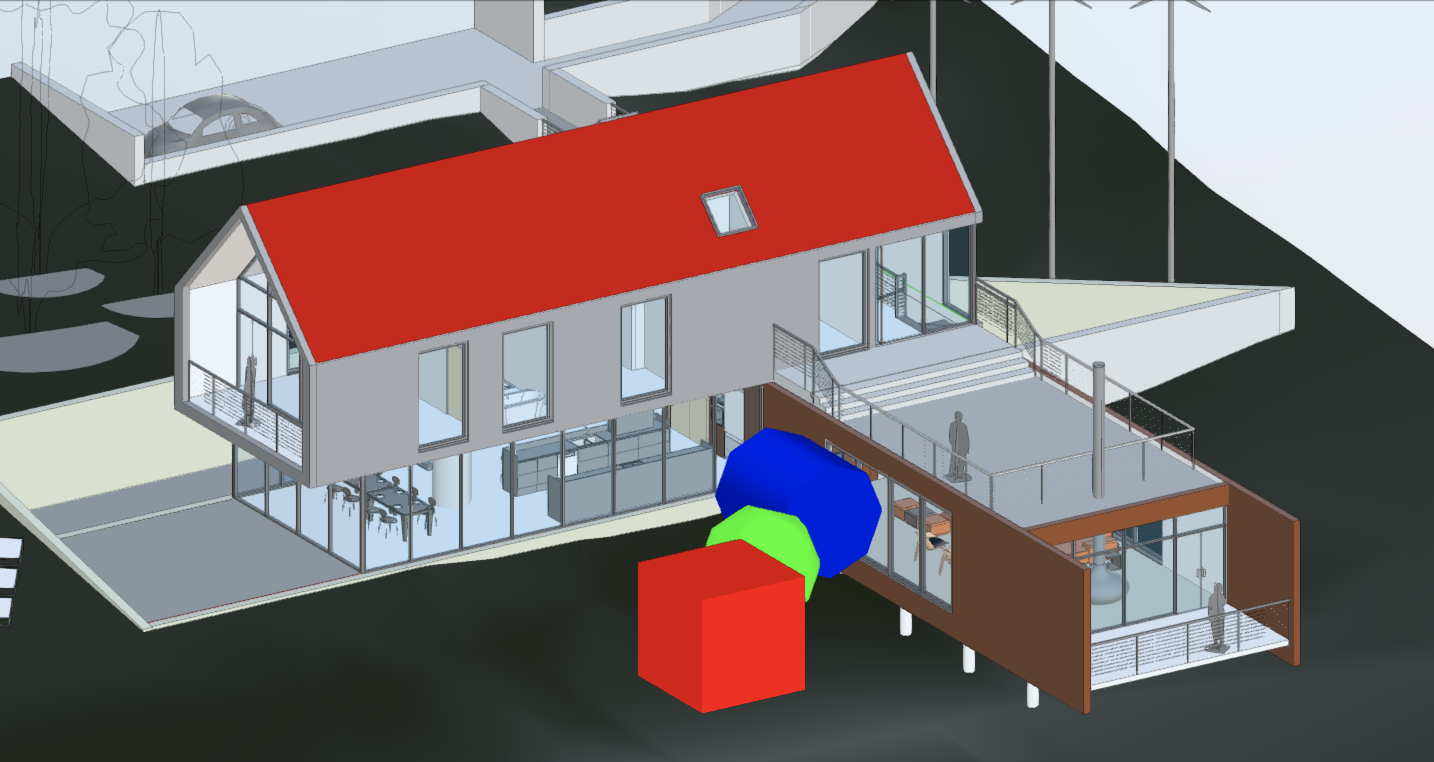
const sphereGeometry = new THREE.BufferGeometry().fromGeometry(new THREE.SphereGeometry(5, 8, 8));
const sphereMaterial = new THREE.MeshPhongMaterial({ color: new THREE.Color(0, 1, 0) });
const sphereTransform = new THREE.Matrix4().compose(
  new THREE.Vector3(0, 0, 0),
  new THREE.Quaternion(0, 0, 0, 1),
  new THREE.Vector3(1, 1, 1)
);
const sphereFragId = modelBuilder.addFragment(sphereGeometry, sphereMaterial, sphereTransform);
modelBuilder.changeFragmentsDbId(sphereFragId, 12345); // Use this dbId in Viewer APIs as usual
- by inserting a new geometry using ModelBuilder#addGeometry, and passing a geometry ID, a
THREE.Material, and aTHREE.Transformto the ModelBuilder#addFragment method, for example:
const cylinderGeometry = new THREE.BufferGeometry().fromGeometry(new THREE.CylinderGeometry(5, 5, 10));
const cylinderMaterial = new THREE.MeshPhongMaterial({ color: new THREE.Color(0, 0, 1) });
const cylinderTransform = new THREE.Matrix4().compose(
  new THREE.Vector3(+10, +10, 0),
  new THREE.Quaternion(0, 0, 0, 1),
  new THREE.Vector3(1, 1, 1)
);
const cylinderGeomId = modelBuilder.addGeometry(cylinderGeometry);
const cylinderFragId = modelBuilder.addFragment(cylinderGeomId, cylinderMaterial, cylinderTransform);
modelBuilder.changeFragmentsDbId(cylinderFragId, 12345); // Use this dbId in Viewer APIs as usual
- if the model is initialized with
conserveMemory: false, you can pass aTHREE.Meshto the ModelBuilder#addMesh method, for example:
const boxGeometry = new THREE.BufferGeometry().fromGeometry(new THREE.BoxGeometry(10, 10, 10));
const boxMaterial = new THREE.MeshPhongMaterial({ color: new THREE.Color(1, 0, 0) });
const boxMesh = new THREE.Mesh(boxGeometry, boxMaterial);
boxMesh.matrix = new THREE.Matrix4().compose(
  new THREE.Vector3(-10, -10, 0),
  new THREE.Quaternion(0, 0, 0, 1),
  new THREE.Vector3(1, 1, 1)
);
boxMesh.dbId = 12345; // Use this dbId in Viewer APIs as usual
modelBuilder.addMesh(boxMesh);
Note: you can also insert point and line geometry. Just make sure that it's a
THREE.BufferGeometrywithisPointorisLineproperty set totrue.
Adding materials
Autodesk.Viewing.SceneBuilder currently supports the following types of materials:
- MeshBasicMaterial
- MeshPhongMaterial
- LineBasicMaterial
- and an internal material type used in Forge models,
PrismMaterial
Apart from passing materials directly into the ModelBuilder methods listed above, you can also register a material under a unique name, and use the name to refer to it later:
const myMaterial = new THREE.MeshPhongMaterial({ color: new THREE.Color(1, 1, 1) });
modelBuilder.addMaterial('MyCustomMaterial', myMaterial);
modelBuilder.addFragment(myGeometry, 'MyCustomMaterial', myTransform);
Other operations
The ModelBuilder class exposes additional methods you can use to manipulate your custom model, for example:
For a detailed overview of all the methods and their arguments, see https://forge.autodesk.com/en/docs/viewer/v7/reference/Extensions/ModelBuilder.
Event handling
Keep in mind that the custom geometry created with ModelBuilder will really act as another model. Because of that, you will also want to use the "aggregate" variants when handling events, for example, using the Autodesk.Viewing.AGGREGATE_SELECTION_CHANGED_EVENT instead of Autodesk.Viewing.SELECTION_CHANGED_EVENT. For more information, please refer to https://forge.autodesk.com/blog/multi-model-refresher.
And that's it. If you're interested in experimenting with the extension yourself, here's a little interactive preview for you: